Introduction
In the previous tutorial, we added the ability to apply some basic transformations to our wireframe cube, but it still looked like a square. In this tutorial, we will:
- Add the ability to rotate wireframes about three axes
Rotations are more complex that the previous two transformations but more interesting. Translations add a constant to coordinates, while scaling multiples a constant by the coordinate, so both preserve the shape of the projection (i.e. square). Rotations on the other hand change the values of two coordinates e.g. `x` and y, by a function of both those coordinates. This means that the coordinates effectively interact, so the z-coordinate will come into play by influencing the value of the x and y coordinates. Thus we will finally see a different side of our 3D object. Hopefully this will become clear with an example.
Defining an axis
Rotations are defined by an angle and a vector through which the rotation occurs. The easiest example is to rotate the cube through an axis parallel to the z-axis. For example, as we look at our cube end on, we rotate the square we see about its centre. As we are rotating about the z-axis, only the x and y coordinates will change, so we won't see our z-coordinates just yet. So it is essentially a 2D problem.
First let's create a method for Wireframe to find its centre. The centre is just the mean of the x, y and z coordinates. In the Wireframe class add:
def findCentre(self):
    """ Find the centre of the wireframe. """

    num_nodes = len(self.nodes)
    meanX = sum([node.x for node in self.nodes]) / num_nodes
    meanY = sum([node.y for node in self.nodes]) / num_nodes
    meanZ = sum([node.z for node in self.nodes]) / num_nodes

    return (meanX, meanY, meanZ)
Converting from Cartesian to a polar coordinates
Since we are going to rotate points about an angle, it's easier to switch to using polar coordinates. This means rather than refer to a point as being x units along the screen and y units up the screen, we refer to it as being an angle and distance from the point of rotation. For example, below, we convert (x, y) to (θ, d).
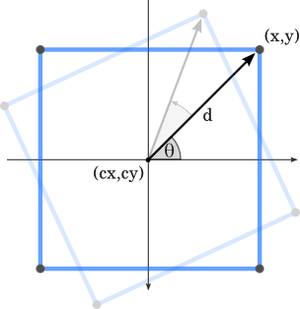
We can find the angle, θ (in radians) using a handy function from the math module called atan2(), which also deals with orthogonal situations. The angle measured, is between the vector and the x-axis. This isn't particularly important, so long as we're consistent when we convert back to a coordinate later.
The distance, d, in the diagram is calculated as the hypotenuse of the triangle formed by the vector:
import math
d = math.hypot(y - cy, x - cx)
theta = math.atan2(y - cy, x - cx)
Converting from polar to a Cartesian coordinates
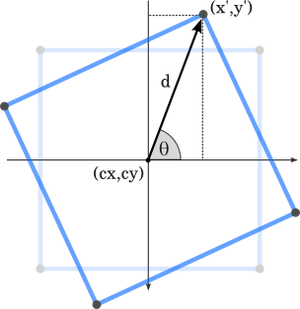
Now we have an angle, θ, we add the angle of our rotation, then convert back to Cartesian coordinates.
The new x-coordinate is the width of the triangle (the distance between cy and y), which is, by simple trigonometry, d × cos(θ). The new y-coordinate is the height of the triangle, which is d × sin(θ).
The complete Wireframe method should look like this (remember to import math at the start of the program):
def rotateZ(self, (cx,cy,cz), radians):
    for node in self.nodes:
        x      = node.x - cx
        y      = node.y - cy
        d      = math.hypot(y, x)
        theta  = math.atan2(y, x) + radians
        node.x = cx + d * math.cos(theta)
        node.y = cy + d * math.sin(theta)
We can now rotate the projected square about its centre with:
cube.rotateZ(cube.findCentre(), 0.1)We still haven't yet seen into the third dimension, but by analogy to a rotation around a vector parallel to the z-axis, we can also rotate our object about vectors parallel to the x- and y-axes with the following methods:
def rotateX(self, (cx,cy,cz), radians):
    for node in self.nodes:
        y      = node.y - cy
        z      = node.z - cz
        d      = math.hypot(y, z)
        theta  = math.atan2(y, z) + radians
        node.z = cz + d * math.cos(theta)
        node.y = cy + d * math.sin(theta)

def rotateY(self, (cx,cy,cz), radians):
    for node in self.nodes:
        x      = node.x - cx
        z      = node.z - cz
        d      = math.hypot(x, z)
        theta  = math.atan2(x, z) + radians
        node.z = cz + d * math.cos(theta)
        node.x = cx + d * math.sin(theta)
Now - finally - we can see all aspects of our cube. Having three separate rotation methods is not the most efficient way to do things - in a later tutorial I show how matrices can deal with transformations more efficiently.
Key Controls
Now we have the rotation transformation functions, we can to add a rotate function to the ProjectionViewer class. The method below rotates all wireframes about their centres and a given axis. Depending on what you want, it may be more useful to rotate all objects about the origin or about the centre of the screen.
def rotateAll(self, axis, theta):
    """ Rotate all wireframe about their centre, along a given axis by a given angle. """

    rotateFunction = 'rotate' + axis

    for wireframe in self.wireframes.itervalues():
        centre = wireframe.findCentre()
        getattr(wireframe, rotateFunction)(centre, theta)
Finally we can update our key_to_function dictionary to bind these new function calls to keys. For example:
key_to_function = {
...
    pygame.K_q: (lambda x: x.rotateAll('X',  0.1)),
    pygame.K_w: (lambda x: x.rotateAll('X', -0.1)),
    pygame.K_a: (lambda x: x.rotateAll('Y',  0.1)),
    pygame.K_s: (lambda x: x.rotateAll('Y', -0.1)),
    pygame.K_z: (lambda x: x.rotateAll('Z',  0.1)),
    pygame.K_x: (lambda x: x.rotateAll('Z', -0.1))}
So at last we can rotate our cube and see it from every angle. In the next tutorial we'll switch to using matrices so we can carry out transformations faster so we can look at object more complex than a cube.
Comments (18)
Defenestration Coding on 6 Aug 2011, 10:50 p.m.
Very good article. I found it very helpful, and I am looking forward to the completion of part 4.
mt11 on 16 Aug 2011, 8:21 p.m.
Cool stuff! Are you going to go into perspective next? That would be super useful :).
peter on 16 Aug 2011, 9:10 p.m.
Thanks! I know I haven't updated this in a while, but I hope to soon, including perspective and proper matrix transformations. I'll try to write it soon.
Tom on 6 Mar 2012, 1:44 p.m.
Can you make a shading tutorial on how to shade surfaces such as a cube?
Anonymous on 24 Mar 2012, 8:32 a.m.
Just a minor note, when discussing the trig terms, you mixed up x and y. You said that the x-coordinate is the height of the triangle, and y-coordinate the width. Your code is obviously right, just the writing is off. This is just errata, this is THE best tutorial that I have seen for this kind of stuff. You are truly enlightening at this stuff.
Peter on 24 Mar 2012, 11:41 a.m.
Thanks for that, you're right, I was being careless. I've updated the text.
Simon on 7 Jun 2012, 12:26 p.m.
Which software do you use in order to create images like this: http://www.petercollingridge.co.uk/sites/files/peter/rotate_square2.png?
Peter on 11 Jun 2012, 11:35 a.m.
The images were created using Inkscape, which is free to download from inkscape.org.
Anonymous on 31 Dec 2012, 4:01 p.m.
Thanks for this, im using a different programming language, but the techniques and explanations are still applicable and very helpful
Prabhakaran on 20 Mar 2013, 9:29 a.m.
Hi
Very helpful article... awesome
Anonymous on 8 Oct 2014, 8:40 p.m.
This is a wonderful tutorial, just for the sake of accuracy, in your rotateX function you have y and z backwards. I alos replaced my rotate functions with this:
def rotate(self,axis,center,radians):
axies = ['x','y','z']
spot = axies.index(axis)
axies = axies[spot+1:]+axies[:spot+1]
center = center[spot+1:]+center[:spot+1]
for node in self.nodes:
a = getattr(node,axies[1])-center[1]
b = getattr(node,axies[0])-center[0]
d = math.hypot(a,b)
theta = math.atan2(a,b)+radians
setattr(node,axies[0],center[0]+d*math.cos(theta))
setattr(node,axies[1],center[1]+d*math.sin(theta))
Anonymous on 11 Oct 2014, 10:32 p.m.
please continue with this. These tutorials are really the best i have found on pygame.
I am really keen to study every bit of these. I really am a beginner, I mean i know the basics of python and pygame but this should really help me to grasp and be able to practive some useful concepts.
Thankyou (and please complete this 3d one)
and make more, these are great!!
Anonymous on 12 Jul 2015, 10:35 a.m.
Really helpful tutorials, I'm programming a 3D engine from scratch using Java, implementing a custom model loader and everything custom from scratch. These tutorials really helped for setting up 3D.
Anonymous on 22 Nov 2016, 11:02 a.m.
Hi Peter
I've just found this tutorial and it's excellent - thank you for taking the time to post.
I have one part which is really confusing me and my poor maths... Can you explain how taking the mean of the x,y and z co-ordinates gives you the center of the Wireframe?
Thanks
Mat.
Anonymous on 7 Dec 2018, 11:12 a.m.
Beautiful man!!
Mr. E on 29 Mar 2019, 4 p.m.
Hey man. Love your tutorials, but I'm having an issue with one of the lines of code. I assume it is different now. The error reads:
def scale(self, (centre_x, centre_y), scale):
^
SyntaxError: Invalid Syntax
Old man - 66 on 5 Jun 2019, 8:51 p.m.
I'm still working in architecture and design and have recently discovered the elegance of Python, as it features heavily in the systems we develop. Although I don't programme in my job now, I'm creating games for my grand kids in pygame and python, but wondered how to create the 3D effect. This is a very intelligent and well thought-through tutorial and you've challenged me with maths that I last did 50 years ago!
By the way, I've never played computer games so look to my kids and grand kids for ideas on the kind of games they enjoy.
Cheers - I hope that there are more of you out there!
rotation on 23 May 2020, 4:23 p.m.
Mr. E,
Replace (centre_x, centre_y) with center and define center_x, center_y = center. Like this:
def scale(self, center, scale):
center_x, center_y = center
...