Introduction
In the previous tutorial we created a three-dimensional cube object, now we want to display it on a two-dimensional screen. In this tutorial, we will:
- Create a simple Pygame window
- Project an image of our 3D object onto the 2D window
As before, you can find the final code by clicking the Github link above.
3D Projections
In order to display our cube we need to convert 3D coordinates, (x, y, z), into 2D coordinates (screen_x, screen_y). This mapping from a 3D coordinate system to a 2D coordinate system is called a projection. You can imagine that we're shining a light from behind our 3D object and looking at the shadow it casts on a 2D screen.
In fact, since our retinas are essentially 2D, all we ever see are projections of objects (albeit stereoscopic projections). So to trick our brain into thinking that the 2D shape on the screen is actually 3D, we need to work out what 2D shapes would form on our retina when the 3D object is projected on to it.
There are many different way to project a 3D object onto a screen (see types of projection on Wikipedia), corresponding to viewing the object from different angles and perspectives. The simplest projection is to imagine that we're looking at our cube head on (so our "line-of-sight" is parallel to, or along, the z-axis). In this case, the z-axis contributes no information to what we see and we can simply ignore it. Since we're using a wireframe model, we don't need to pay attention to the order of elements along the z-axis.
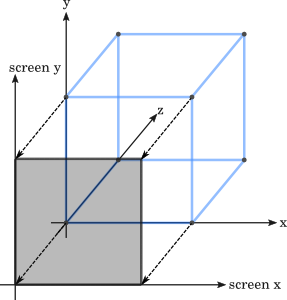
In terms of vector transformations, we are using the linear transformation: T(x,y,z) → (x,y).
The projection viewer
In order to keep our code tidy, we'll put the code dealing with displaying wireframes in a separate file. This will allow us to use alternative code to display wireframes if we prefer. So in a new file called wireframe_display.py or something similar, import pygame and our wireframe module. Make sure the wireframe.py file is in the same folder so you can import it.
import wireframe
import pygame
Now let's create an class to deal with displaying projections of wireframe objects. It will contain all the variables concerned with how objects are displayed, such as the screen dimensions, the colours used and whether to display the nodes and/or edges. It also contains an empty dictionary which will contain the wireframes.
class ProjectionViewer:
    """ Displays 3D objects on a Pygame screen """

    def __init__(self, width, height):
        self.width = width
        self.height = height
        self.screen = pygame.display.set_mode((width, height))
        pygame.display.set_caption('Wireframe Display')
        self.background = (10,10,50)

        self.wireframes = {}
        self.displayNodes = True
        self.displayEdges = True
        self.nodeColour = (255,255,255)
        self.edgeColour = (200,200,200)
        self.nodeRadius = 4
Hopefully you are familiar with the basics of Pygame. If not, you can look through the first couple of tutorials in my Pygame physics tutorial. We now add a run() function to the ProjectionViewer which will display a pygame window.
def run(self):
    """ Create a pygame screen until it is closed. """

    running = True
    while running:
        for event in pygame.event.get():
            if event.type == pygame.QUIT:
                running = False

        self.screen.fill(self.background)
        pygame.display.flip()
We can now create a ProjectionViewer object and run it. This should create a 400 x 300 pixel window with a deep blue background ready for our wireframe.
if __name__ == '__main__':
    pv = ProjectionViewer(400, 300)
    pv.run()
In order to display wireframe, we need to be able to add them to the ProjectionViewer, so let's add a method for just that:
def addWireframe(self, name, wireframe):
    """ Add a named wireframe object. """
    self.wireframes[name] = wireframe
By using a dictionary, we can add multiple wireframes and then manipulate them separately (rotating one for example). We can now create wireframe cube as before (a bit more tersely this time) and add it to a ProjectionViewer object.
cube = wireframe.Wireframe()
cube.addNodes([(x,y,z) for x in (0,1) for y in (0,1) for z in (0,1)])
cube.addEdges([(n,n+4) for n in range(0,4)]+[(n,n+1) for n in range(0,8,2)]+[(n,n+2) for n in (0,1,4,5)])

pv = ProjectionViewer(400, 300)
pv.addWireframe('cube', cube)
pv.run()
Displaying wireframes
The code still doesn't actually display the wireframes, so let's now add a display method to ProjectionViewer:
def display(self):
    """ Draw the wireframes on the screen. """

    self.screen.fill(self.background)

    for wireframe in self.wireframes.values():
        if self.displayEdges:
            for edge in wireframe.edges:
                pygame.draw.aaline(self.screen, self.edgeColour, (edge.start.x, edge.start.y), (edge.stop.x, edge.stop.y), 1)

        if self.displayNodes:
            for node in wireframe.nodes:
                pygame.draw.circle(self.screen, self.nodeColour, (int(node.x), int(node.y)), self.nodeRadius, 0)
The display() method fills the background then draws all the wireframe nodes as circles at the (x, y) coordinates of the node, ignoring its z coordinate and draws edges as anti-aliased lines between the relevant nodes' (x, y) coordinates. We call the display() method in the run() method's loop where we were previously just drawing the background:
while running:
    for event in pygame.event.get():
        if event.type == pygame.QUIT:
            running = False

    self.display()
    pygame.display.flip()
Fixing the coordinates
If you run the program now you will see a bit of a circle in the top left corner because we're currently drawing the circles for the nodes at (0,0), (1,0), (0,1) and (1,1). We can create a more sensible cube by changing its nodes to:
cube.addNodes([(x ,y, z) for x in (50, 250) for y in (50, 250) for z in (50, 250)])Note that we don't actually have to change the z coordinates for moment, but we might as well. In the next tutorial we'll add methods for zooming and panning the display so we can view our unit cube (with 0 and 1 coordinates). Another issue is that we are viewing our cube 'upside-down' since the y-axis actually starts at the top of the screen and goes down. We'll deal with this problem in later tutorial.
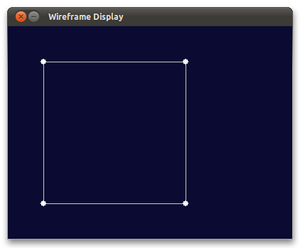
Now if you run the program you should see something like this.
This is what our cube looks like when we view it directly end on. It might seem like we've cheated. If you're familiar with Pygame then I'm sure you could have drawn a square and a few circles with a lot less effort. However, in the next two tutorials we'll deal with various transformations of the cube including rotations, which will hopefully convince you that we're actually looking at a 3D object.
Comments (6)
David on 31 Jul 2014, 11:43 p.m.
I found this tutorial very helpful. Its not to complicated to follow and clearly demonstrates all that I need to know about each necessary topic. Thank You.
Ant Young on 28 Feb 2015, 6:37 p.m.
Hi,
Just wanted to say thank you for doing this. I am working through your tutorials and am really enjoying them.
All the best Ant
Juan on 17 Jun 2018, 6:30 a.m.
Hi. Ive got a problem where my screen is blank.
No square.
If you have one can you pleaze tell me how to fix it
Poney_maldito on 3 Nov 2018, 3:11 p.m.
Just put the self.display() inside the run() function after filling the background.
anonymes on 12 May 2020, 4:19 p.m.
Hi. I have a problem in cube = wireframe.Wireframe(), it says wireframe is not defined but I have self.wireframes[name] = wireframe.
How can I solve this?
Noe Boddy on 24 Jun 2020, 12:43 a.m.
@anonymes
Try replacing your wireframe_display.py code with this:
import wireframe
import pygame
class ProjectionViewer:
""" Displays 3D objects on a Pygame screen """
def __init__(self, width, height):
self.width = width
self.height = height
self.screen = pygame.display.set_mode((width, height))
pygame.display.set_caption('Wireframe Display')
self.background = (10,10,50)
self.wireframes = {}
self.displayNodes = True
self.displayEdges = True
self.nodeColour = (255,255,255)
self.edgeColour = (200,200,200)
self.nodeRadius = 4
def run(self):
""" Create a pygame screen until it is closed. """
running = True
while running:
for event in pygame.event.get():
if event.type == pygame.QUIT:
running = False
self.display()
pygame.display.flip()
def addWireframe(self, name, wireframe):
""" Add a named wireframe object. """
self.wireframes[name] = wireframe
def display(self):
""" Draw the wireframes on the screen. """
self.screen.fill(self.background)
for wireframe in self.wireframes.values():
if self.displayEdges:
for edge in wireframe.edges:
pygame.draw.aaline(self.screen, self.edgeColour, (edge.start.x, edge.start.y), (edge.stop.x, edge.stop.y), 1)
if self.displayNodes:
for node in wireframe.nodes:
pygame.draw.circle(self.screen, self.nodeColour, (int(node.x), int(node.y)), self.nodeRadius, 0)
if __name__ == '__main__':
cube = wireframe.Wireframe()
cube.addNodes([(x ,y, z) for x in (50, 250) for y in (50, 250) for z in (50, 250)])
cube.addEdges([(n,n+4) for n in range(0,4)]+[(n,n+1) for n in range(0,8,2)]+[(n,n+2) for n in (0,1,4,5)])
pv = ProjectionViewer(400, 300)
pv.addWireframe('cube', cube)
pv.run()