Science · Code · Curiosity

Drawing circles
In the previous tutorial we created a blank white screen; now we want to display some graphics on it. In this tutorial, we will:
- Draw a circle in our window
- Define a Particle class
- Create and display a Particle object
This program builds on the code from the previous tutorial. The line numbers show where code should be added assuming the program is written exactly like the program written in the previous tutorial (including blank lines). In this tutorial and all the following tutorials, the final code is available by clicking the Code on Github link at the start of the article.
Drawing with Pygame
In Pygame there are various functions for drawing simple shapes. We will display our particles as circles so use the `pygame.draw.circle()` function. This function takes several parameters:
- A surface where the circle will be drawn (here it's our screen)
- A colour
- An (x, y) coordinate
- A radius
- A thickness (optional)
For example:
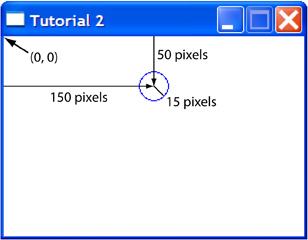
pygame.draw.circle(screen, (0,0,255), (150, 50), 15, 1)This draws a blue ((0,0,255) is blue in RGB notation) circle centred at (150, 50), with radius 15 and thickness of 1 pixel. Note that this function must be called after the screen.fill(background_colour) command and before the flip() command. If you run the program now you should see something like this (I also changed the title of window, but it's not important).
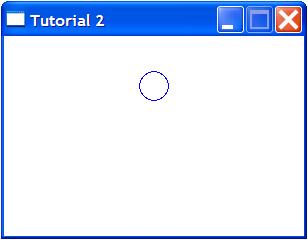
If you’re not familiar with how computer displays work, you might have expected the circle to be near the bottom of the screen, since the particle's y-coordinate is 50 and the screen is 200 units high. However, on a computer display, the origin (0, 0) is in the top, left of the screen, with the x-axis increasing from left-to-right and the y-axis increasing from top-to-bottom; the circle is therefore centred 50 pixels down from the top of the screen.
The Particle object
In our final simulation we will want several particles, each of which will have the same type of attributes. Thus it makes sense to define a Particle class. When we create each Particle object with the `__init__` function (note the double underscores which indicates a built-in method), we will give it an x,y coordinate and a size. The colour and line thickness will be given default values. We'll add more attributes as we go along.
class Particle:
  def __init__(self, (x, y), size):
    self.x = x
    self.y = y
    self.size = size
    self.colour = (0, 0, 255)
    self.thickness = 1
Next we add a `display()` method to our Particle object that will draw it (as a circle) on the screen.
def display(self):
  pygame.draw.circle(screen, self.colour, (self.x, self.y), self.size, self.thickness)
Now we can remove the `pygame.draw.circle()` call and replace it by code that creates a particle object (defining its x, y coordinates and size) then calling its `display()` method. If you're not familiar with object-oriented programming, this may seem more long winded, but it will make building on our program a lot easier later on.
my_first_particle = Particle((150, 50), 15)
my_first_particle.display()
If you run the program now, it should look exactly the same as before. However, in the next tutorial I'll show you how the code now can be easily changed to display many more circles. I'll also introduce the random module which is very handy when creating simulations.
Comments 30
Leave a comment
Comments are moderated and will appear after approval.
I spotted a typo. In code line 21:
my_first_particles = Particle((150, 50), 15)
The variable name should be "my_first_particle" (without the final 's'), to match the call in the next line.
Just wanted to let you know, so that these excellent tutorials of yours are no less than perfect. ;)
So far this tutorial has been a new experience for me.
However, I was stuck on this tutorial for at least one hour, as I was presented with an error message telling me "this constructor takes no arguments". After some research on the internet, I found out that there were two underscores on both sides of "init", not just one!
Maybe I'm a lone fool, but you could possibly update this content and briefly note how it is two underscores at each side, to allow for other users to overcome this problem.
As I say, apart from this(even though it was my own fault), so far so good!
Thanks.
Thanks, I've changed it.
Every time I re-read what I've written I spot a couple of typos (it's because I keep changing my mind about things - that and I'm careless). It really helps if other people look out for them too.
Sorry about that David. I know how frustrating it can be to spend hours with an error only to find its a minor typographical issue. In my defence, the double underscore is a requirement of Python and not a Pygame thing, which is the focus of this tutorial. But I'll add a note to make it clear for everyone.
Thanks for your feedback.
Hi, Love this tutorial, but i'm stuck with this problem
when I run the code upto this point I get a syntax error at "(" which I have highlighted ,
Can you help me out with this. I'm using python 3.1 and compatiable pygame version.
class Particle:
def init(self, (x, y), size):
It seems that tuple parameter unpacking doesn't work in Python3. Try:
class Particle:
def init(self, position, size):
self.x, self.y = position
Hii
when I run your code I dont get any errors but the screen is first white then turns black and then stays white for ever. why is it getting that black in white any idea ??
Hi Faizan. I'm not sure what's happening when you run the program. Is the code exactly the same as I've written here? You could try moving the lines:
screen.fill(background_colour)
my_first_particle.display()
and
pygame.display.flip()
into the while loop so they are called every iteration, which would be a more normal way to do things.
This tutorial finally gave me a good grasp on the importance and efficiency of classes. Thanks so much!
Hi, I tried what you suggested and it says:
particle_01 = Particle(150, 50, 15)
TypeError: init() takes exactly 3 positional arguments (4 given)
Help?
Sorry I should have said, you still create the particle with the same call, i.e:
particle_01 = Particle((150, 50), 15)
I think that should work, but I don't have Python 3 to test it. If it doesn't then create the particle as you are now change the Particle class to:
class Particle:
def init(self, x, y, size):
self.x = x
self.y = y
this bit doesn't work in Python 3.1.1
class Particle:
def init(self, x, y, size):
self.x = x
self.y = y
Help!
You might need to change the first line to,
class Particle(object):
This is what I did to get the code to work for Python3.3:
class Particle:
def init(self, position, size):
self.x = position[0]
self.y = position[1]
self.size = size
self.colour = (0, 0, 255)
self.thickness = 1
pygame.draw.circle(screen, self.colour, (self.x, self.y), self.size, self.thickness)
self.colour should be self.color
I tried running the program but I keep getting an attributeerror " 'particle' object has no attribute 'display' "
How can I fix this?
I suspect you need to fix the indentation of the display method so it is inside the Particle class.
NameError: global name 'x' is not defined
class Particle:
def init(self, position, size):
self.x = position[0]
self.y = position[1]
self.size = size
self.colour = (0, 0, 255)
self.thickness = 1
works for me in python3!
this is fantastic stuff -- I haven't looked at a ton of this yet but I love the merger of early-skills tutorial with super cutting edge physics stuff...
Coming from a Perl background, where each class definition goes in a separate file, I created my Particle class in a separate file. The problem I ran into was that the display() method knows nothing about the variable screen. I would advise passing screen into the display() method. Alternatively, you could include it in the constructor, but then each particle would be tied to a single Surface (which is a type in pygame, but you can have many Surfaces in your game). There are technical reasons to do that anyway ('encapsulation'), even if your code is all in one file.
show whole code please
You can get the whole code by following the link to Github.
I come from a low level assembly (x86, atmel, ST, 6502 chips) and i never got into graphics or game programming, and i have to say that tuples can be kind of tricky. I had to access each position[0]&[1] as opposed to unpacking the x,y tuple. Im kind of embarrassed to say i was stumped for a good hour. That's the best part of what we do... ;slogging through the version hell and realizing it was something so stupid. I wish there would be one language that does not change ever. I'm so tired of instruction sets, opcodes etc... I am really enjoying your stuff. I dont know if you mentioned what version you are running. it can lead to newbies getting mad and blaming you. I totally get it and love your effort! I know i am many years ahead writing... That damn tuple was driving me nuts. I dont like to run to stack overflow or quora because that will multiply the insanity. What i learned today is that, simplicity is key and from now on we should all explicitly be more verbose about versioning. (position[0],position[1]) that was my problem. and ive been programming chips for 10 years! Thanks for your content.
( red , green ,blue )
For anyone struggling, this is the full code that works on Python 3.8.3 in 3 parts
setting up the screen.Part one
import pygame
pygame.init()
(Width, Height) = (600,400)
background_colour = (173,216,230)
screen = pygame.display.set_mode((Width,Height))
Part 3
testing the functionmy = Particle((150, 50), 15)
display(my)
pygame.display.flip()
close the game when you press the quit.running = True
while running:
for event in pygame.event.get():
if event.type == pygame.QUIT:
running = False
Thanks Adam for the update so many years later! Def helped me out
Hey Guys, I found an issue witn the code above.
1. There was no particle display at all.
I found out that you need to run pygame.display.update() after a draw statement - just put this into "display(self)" and youre good!
Oh and if you're trying to draw a rectange, use that code to define it:
into init:
self.rect = ((self.x, self.y), (self.size, self.size))
into display:
pygame.draw.rect(self.screen, self.colour, self.rect)
Have a good one!
Hi guys, despite my best efforts I'm not able to get this running in Python 3.7. The problem is the "tuple issue", however even the fixes of previous contrinbutors don't seem to work.
It would be fantastic if someone has an idea...
class Particle:
def init(self, position, radius, color):
self.x = position[0],
self.y = position[1],
self.radius = radius,
self.color = color,
self.thickness = 0
Particle1 = Particle((200, 200), 15, BLACK)
Particle1.display()